Poster Design with Photoshop
Thebestindonesia.com – Adobe Photoshop is an application or software that is quite popular among image designers. This application has been around for a long time and has even become one of the most widely used. With this application, users can edit and change images in various ways. With its powerful tools, users can modify pictures to the smallest detail by carrying out actions such as drawing, cropping, typing, slicing, deleting, modifying and manipulating shapes, changing color, resizing, and more. Adobe Photoshop can also be used for video editing and for creating objects for 3D printing. There are also many add-ons or add-ons for Adobe Photoshop, which will help users enrich their experience by, for example, adding filters or special effects to their images.
It is used extensively for advertising and in publications such as magazines by professional image editors and designers, filmmakers, artists, and other professionals. However, Adobe Photoshop’s simple and intuitive interface makes it accessible for beginners and amateurs interested in changing and manipulating images. Digital image manipulation has contributed so much to the world of photography by enabling manipulations that were previously difficult or even impossible. Therefore, Adobe Photoshop plays a significant role in the development of today’s digital world.
Adobe Photoshop provides integrated, and conveniently organized tools for creating and producing perfect vector and text works. Graphic forms based on vectors and text can be transferred into images in pixel form to get a more pleasing and ideal design effect.
Photoshop Workspace
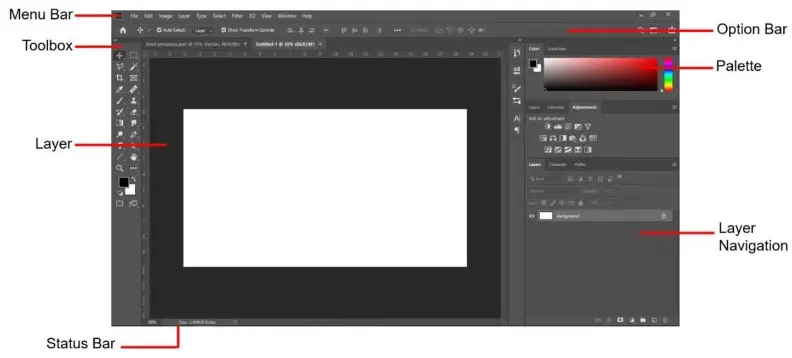
The work area in Adobe Photoshop consists of the Menu Bar, Options Bar, Toolbox, Layers, Palette, and Status Bar.
- Menu Bar, consisting of menu options for operating the entire application.
- Option Bar, this view will change dynamically according to the tool used.
- Toolbox consists of facilities for editing or manipulating images.
The Toolbox is divided into four groups for easy learning based on its primary function. The following are some of the components in the Toolbox:

Selection Tool
These tools help make selections on objects.
- Marquee makes selections in the form of rectangles, circles, and lines.
- Move, and shift the object on the active layer. Lasso, make a free selection.
- Magic Wand makes a selection based on the level of color similarity.
- Crop removes unused parts of the canvas object/image frame.
- Slice makes a selection to divide the image into several pieces.
Painting and Editing
- Healing, making duplicates of objects by sliding.
- The paintbrush simulates brush strokes when coloring objects.
- Clone Stamp takes a specific surface color sample to be duplicated on the surface of other parts.
- History Brush returns the object to a position like a specific history; the Eraser covers the color with the foreground color.
- Paint Bucket fills areas that have a resemblance to the place when pressing the mouse. Blur, and darken the color of the object.
- The eyedropper replaces the foreground color with the desired sample.
Read also : Design Vector Tank Using CorelDraw
Special Tools
- Dodge lightens the color of objects.
- The path Component shifts the location of the points made on the path.
- Text writes horizontal text on objects.
- The pen creates a path that can be used as a selection or drawing tool.
- Rectangle, make a rectangular box.
- Notes, make notes on objects that can be added with audio.
Navigation
- Hand, shift the work plane to the desired position.
- Zoom, enlarge, or reduce the view of the object.
Layer
The layer where the image is placed. It can contain various pieces of images that form a whole unified image. The layer navigator functions to view navigation details from the displayed layer to exercise control during editing.
Palette
Palette consists of a set of color menu palettes and a navigator palette that is used to move or zoom in on an image through a miniature copy.
Status Bar to view general information about the image being processed.
Color Modes and Models
The color mode determines the model used to display and print an image.
- RGB (Red, Green, Blue), the RGB model is often called addictive colors (mixed colors) by mixing red, green, and blue.
- CMYK (Cyan, Magenta, Yellow, Black), based on the light absorption quality of the ink printed on the paper. For example, bright white can cause the ink to turn translucent.
- Bitmap Mode uses one of two color values (black or white) to represent pixels in an image. Images in Bitmap mode are commonly referred to as 1-bit Bitmapped (images have a bit depth of 1.
- Grayscale Mode uses more than 256 shades of gray. Values in this mode are assigned percentages, with 0% white and 100% black.
- Duotone Mode, using 256 colors which will choose the closest color to the original image color or simulate colors using the available colors if a color in the original image does not appear when converted to indexed color.
- Multichannel Mode, using 256 levels of gray on each channel which is helpful for special printing.
Poster Design
- Create a New Document
Select menu File > New. Write a file name. Select the file size or choose the file size already in the options menu. Click Create. - Resizing the Image
a. Select menu File > Open
b. Select the image to resize. If the image is already on the canvas, you can select image> Canvas Size, then change the file size. Click OK.
c. Select the Image > Size menu. Select the Resample Image check box to change the resolution value and the Width and Height values. Change this value as needed. If you want to keep the size proportional between length and width, you can press the automatic to resample checklist. Click OK. - Rotate the image
Click the image to rotate. Click on image> Image Rotation or right-click on the selected object. The following is a submenu of the icon options:- 180*, rotate the flipped image so that it returns to its legs, Alt + I, E, 1.
- 90* CW, rotate the image 90 degrees clockwise, Alt + I, E, 9.
- 90* CCW, rotates the image 90 degrees counterclockwise, Alt + I, E, 0).
- Arbiritary, straightening the image.
- Flip horizontally, fixing the text upside down (alt + I + E + H).
- Flip vertically, and flip the top and bottom of the image (alt + I, E, V).
- Cropping Images
Click the Crop tool icon in the Toolbox. Slide the crop limit and shift it according to your needs. Click the check mark on the Options Bar row, double-click within the crop limit, and press enter. - Remove the Background
Open the image you want to remove the background from—double-click on the navigator layer to deselect the selected layer and click OK. You can remove the environment in various ways, such as using the Lasso Tool icon or the Magic Wand Tool. Click on the object to remove the background. Click delete.